What Happens When You Specify a Shadow Gap (A Step-by-Step Behind the Scenes)
You’ve decided your project needs shadow gap profiles. Excellent decision. Very tasteful. Your client will be impressed, your contractor will thank you (eventually), and the finished space will look like it belongs in a magazine rather than a snagging list.
But what actually happens between “I’d like shadow gap details please” and those crisp, perfect lines appearing on site? Glad you asked. Grab a cup of tea and let us walk you through it.
Step 1: You Get in Touch (The Easy Bit)
It starts with a conversation. You give us a call, send an email, or fill in the contact form on our website. At this point, you don’t need to have everything figured out. You might have detailed architectural drawings. You might have a napkin sketch and a general sense of optimism. Both are fine.
Our design team – based at our facility in Essex – will ask you a few questions about the project: the type of shadow gap details you’re after (skirting, architrave, ceiling junction, external corners, fair ends, or a combination), the wall build-up, the flooring type, and any specific dimensions or design preferences.
If you’re not sure about any of that, don’t worry. That’s literally what we’re here for.
Step 2: We Model It in 3D (The Clever Bit)
Once we understand what you need, our design team creates 3D models of the profiles and how they’ll integrate with your wall and floor build-up. This isn’t just a nice visual exercise. It lets us check tolerances, confirm dimensions, and spot any potential issues before we manufacture anything.
You get to see exactly what your shadow gap detail will look like before a single profile is produced. If something needs adjusting – a wider gap, a different depth, a tweak to accommodate an unusual floor finish – we sort it out at this stage, not on site at 4pm on a Friday.
Think of it as a dress rehearsal for your walls.
Step 3: We Manufacture (The Satisfying Bit)
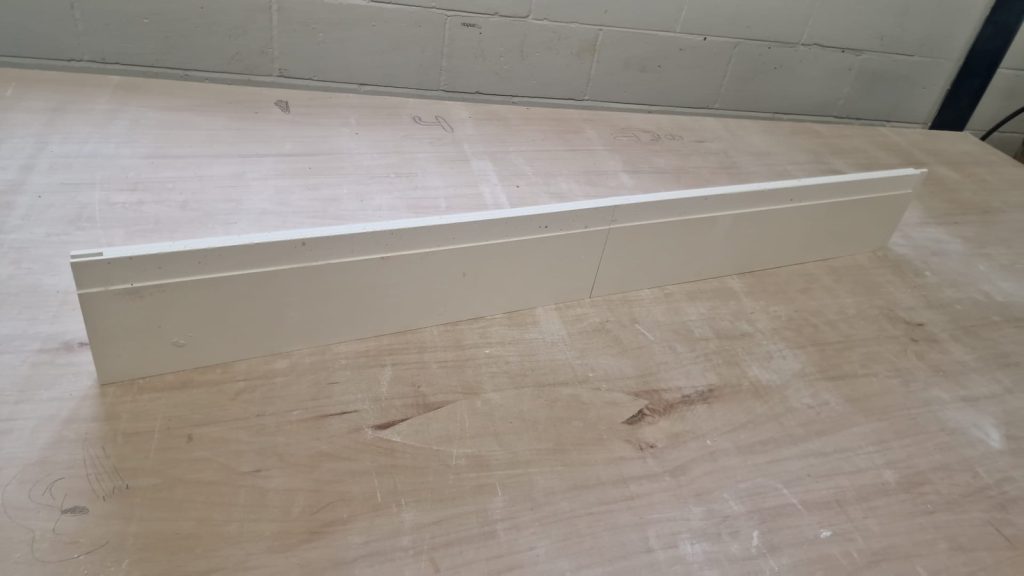
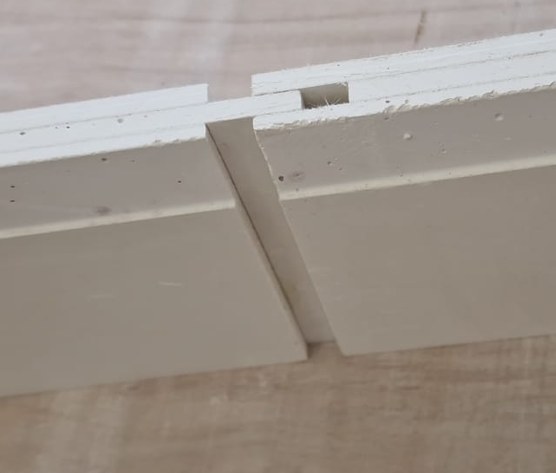
Once you’ve signed off the design, we get making. Our manufacturing facility in Essex produces every profile using patented Seamless Abutment technology. The profiles are gypsum-based alpha plaster sections with preformed shadow gaps and tapered edges built right in.
Each piece is precision-cut to your project’s specific dimensions. No generic lengths that need trimming on site. No “near enough” tolerances. If you specified a 10mm shadow gap, you get a 10mm shadow gap. Consistently. Across every single profile.
Step 4: We Pack and Deliver (The Practical Bit)
Depending on the project, your profiles arrive either flat-packed or pre-assembled. We package everything carefully because, unlike a bag of screws, these are precision-finished components that need to arrive on site in perfect condition.
Delivery is coordinated with your programme so the profiles turn up when your team actually needs them, not three weeks early when they’ll get buried under plasterboard, and not two days late when everyone’s standing around looking at their watches.
Step 5: Your Team Installs (The Quick Bit)
This is where your site team takes over, and where the off-site manufacturing really pays off. Instead of spending hours building up shadow gap details from scratch using battens, packing, and plasterboard offcuts, your plasterer or dry-liner receives preformed profiles that fix directly to the substrate.
The profiles are designed to integrate seamlessly with standard plasterboard, so finishing is straightforward. The preformed tapered edges mean the junction between the profile and the surrounding board disappears after skimming – leaving a clean, continuous surface with a crisp shadow line exactly where you wanted it.
The typical reaction from site teams the first time they install our profiles is something along the lines of: “Oh. Is that it?” Yes. That’s it. You’re welcome.
Step 6: Everyone Admires the Finished Result (The Best Bit)
The plaster’s dry. The floor’s down. The shadow gap is doing its thing – a perfect dark line where wall meets floor, making everything look sharp, modern, and like someone genuinely thought about the details.
Your client walks in and says “this looks amazing.” The architect takes a photo for their portfolio. The contractor quietly notes that the shadow gap detail took half the time they’d budgeted. The plasterer tells their mate down the pub about these profiles that arrive ready to go.
And you? You look like you know exactly what you’re doing. Which, to be fair, you do.
How Long Does All This Take?
From initial enquiry to delivery, turnaround depends on the complexity and scale of the project. Simple, standard profiles can be turned around quickly. Bespoke details with unusual dimensions or configurations take a little longer. But we’ll always give you a clear timeline upfront so you can plan accordingly.
The short answer is: faster than you’d think, and definitely faster than trying to achieve the same result on site.
Ready to specify shadow gap profiles for your next project? Let’s talk.
Call us on +44 (0) 1279 216175 or email info@seamlessabutments.com